Introduction
Payment methods represent the different payment options available to customers during the checkout process on an e-commerce store. Spree supports many types of payment methods, including both online and offline options. This guide describes how to add payment methods to your Spree store.
Terminology
Let’s begin by explaining the difference between a Payment Gateway and a Merchant Account.
Payment Gateway - A payment gateway is a service that authorizes credit card payments, processes them securely, and deposits the funds into your bank account. A payment gateway performs the same functions as a credit card swipe machine at a restaurant or retail store, it just performs these functions for purchases made online instead of in person.
Merchant Account - A merchant account is a type of bank account that allows you to accept credit card payments online. If you have a retail business and already accept credit card payments, then more than likely you have a merchant account. When you start to sell products online, you may need to call your bank and ask that they set you up with an Internet merchant account. An Internet merchant account allows you to accept payments online without having the customer’s credit card physically in front of you.
Evaluating Payment Gateways
When researching payment gateway options, you may find that they offer an all-in-one solution that includes both the gateway and the merchant account. This is just something to be aware of and to evaluate if it makes sense for your store. Payment gateways also charge a fee for their services. Here are a few of the fees you might come across when evaluating providers:
Setup Fee - A one-time charge to set up your payment gateway account.
Recurring Fixed Monthly Fees - A fixed monthly fee that a payment gateway provider charges for access to their services and reports. Some gateways break this charge down further into a monthly Gateway Fee and a Statement Fee.
Transaction Fees - A charge for each purchase made on your e-commerce store. The pricing structure for these fees differ per gateway. A popular structure is to charge a percentage of the purchase price plus a flat fee. For example, 2.9% of the purchase price plus $0.30 per transaction.
Add a Payment Method
Spree enables you to utilize the payment method of choice for your e-commerce store. We have two preferred payment gateway partners and a long list of payment gateways that are supported by default in Spree. We also enable you to add a custom payment gateway, as well as offer offline payment options such as checks and purchase orders.
Add a Supported Gateway
Read through the following explanatory text to add one of the supported payment gateways as a payment method on your store.
Select Provider
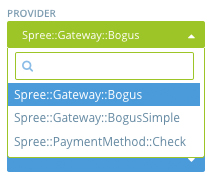
To configure one of the supported payment gateways, you must first install the Spree_Gateway extension on your store. More than likely, you will want to ask someone from your technical team to do this. Once this extension has been installed, you can configure one of the supported gateways in the Admin Interface by clicking the “Configuration” tab and then clicking the “New Payment Method” button.
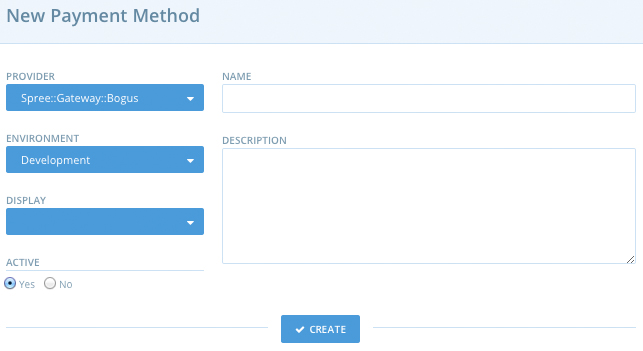
If you installed the Spree_Gateway extension, you will see a long list of gateways in the “Provider” drop down menu. Select the one that you would like to add.
Environment
Choose the environment where you would like to enable the payment method. The choices are:
- Development - Used by developers when they are testing a Spree store on their local machine.
- Production - Select if you want the payment gateway to appear on the customer-facing area of your store.
- Test - Used by developers who are testing their Spree store, typically with our test suite.
Display
Select whether you want the payment method to appear on the Frontend or the Backend of your store, or both.
The Frontend is the customer-facing area of your store, meaning that the payment method will display as a payment option to your customers during the checkout step.
The Backend is the Admin Interface for your store. Site administrators typically select this option when they want to make a payment option available to their internal staff but not to their end customers. For example, you might want to offer purchase orders as a payment option to customers on a one-off basis, but only if they contact one of your customer service representatives via email or telephone.
Active
Select “Yes” if you want the payment method to be active on your store. Select “No” if you want to create the payment method, but not present it on your store until a later point.
Name
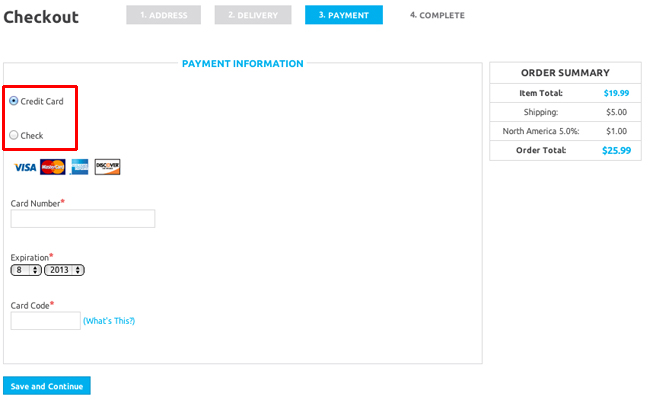
Give the payment method a name. The value you enter will appear on the customer-facing area of your store, on the Payment page as seen below:
Description
Add a description for the payment method. This field is optional and is only displayed to internal users and not to customers.
Click “Update” once you’ve input the desired settings for your new payment method.
Add a Non-Supported Gateway
It is possible to add a new payment gateway that is not included on the supported by default gateway list, but doing so is outside the scope of this tutorial. Please consult with your development team if you need this functionality.
Edit a Payment Method
To edit the configuration settings for an existing payment method, go to the Admin Interface, click the “Configuration” tab, and then click the “Payment Methods” link. Find the payment method that you would like to edit on the list that appears. Click the “Edit” icon next to the payment method to edit its settings.

Make the desired changes to the payment method settings and then click “Update” to save them.
Processing Payments
Processing orders and the payments associated with them are covered in detail in the Processing Orders guide.